When you're ready to go live with your site, it's valuable to understand the process of what is happening in the background before committing yourself to the process.
If you already have a live website, the process is going to involve reassigning your web address from your current site to your new one in SiteFarm. From the time you initiate the request until the switch has been completed, you will not be able to make updates to either site. Usually, the switch takes approximately four hours, so please plan accordingly.
T-minus and counting...
When you feel your site is ready to go live to the web, please use this checklist to help you step through the process.
Step 1: Request a review of your site by the SiteFarm team (Optional)
We want you to feel happy and confident about your web presence and are as invested as you are in helping put your best foot forward. If you're interested in having us glance over your site, we can help you spot any points of concern and make suggestions to improve the overall look and function of your site. Make your request at sitefarm@ucdavis.edu.
Verify that your web site contains, and solicits (via webforms, or otherwise) only approved data types as outlined by the Data Security Guide.
If you decide to forego a site review by our team, be certain to review your site against the site requirements stipulated in campus policy 310-70
UC Davis' campus policy 310-70 is a document outlining the requirements for using SiteFarm, including design, accessibility, required elements, branding/color palettes, and other best practices in web standards. If you deviate from the policy requirements without authorization from our team and the Office of Strategic Communications, your site may need to be set back to development mode or our team may need to step in and make immediate required changes to bring your website into compliance depending on the nature of the concern. Such steps will be communicated via email to any overseeing Client Group team or to active Site Managers on the site.
Step 2: Sign up with Duo if you haven't already
In May 2018, the campus began moving to Duo, a multi-factor authentication system, in order to improve overall security and decrease the likelihood of compromised passwords. If you haven't heard of it and/or haven't signed up for it yet, this is necessary in order to later properly add your site to the new CAS Service Registry. Read the Knowledge Base article on Duo and how to enroll.
Step 3: What are your plans for your live domain name?
- Decide on a web domain if you don't have one
If you already have a domain URL, you're welcome to continue using it. If you don't, decide what that live domain should be at this point. For the next steps, continue with your planned URL and then make it official when you contact the campus host clerk in Step 7. If you've informed us of your preferred domain and then need to change it later after your conversation with the host clerk, it's no problem to let us know so we can update our records. When deciding on your live domain, the format should look like sitename.ucdavis.edu.
Example: sitefarm.ucdavis.edu or hr.ucdavis.edu or globallearning.ucdavis.edu - Do you plan on having an address like www.oursite.ucdavis.edu or computing.facilities.ucdavis.edu? If so, they require special steps:
NOTE: This is intended for units who have multiple sites falling within the same namespace.
Example: site1.ourunit.ucdavis.edu, site2.ourunit.ucdavis.edu
If you will be using a sub.subdomain.ucdavis.edu domain name, including www.yoursitename.ucdavis.edu, please alert sitefarm@ucdavis.edu so we can configure the SSL certificate appropriately in advance. If you do not, your site will show a security error. Be aware that this sub.subdomain setup does require additional steps to configure and if you have a specific launch date in mind, please note that these SSL certificates 3-4 weeks to process due to the administrative steps we are required to complete.
Step 4: Select your launch day
- Select any day of the week except for Friday. Launching new sites right before the weekend is never a good idea in case something goes wrong and support is unavailable.
- Be aware that once you initiate your launch requests, you will not be able to update your SiteFarm site until the update process is complete. The process will take approximately four hours from the time you submit your request to the host clerk as outlined below.
Step 5: Register your live URL with the campus' CAS Service Registry
Use the information we've outlined in our Registry documentation to enroll your site with the CAS Service Registry.
The CAS Service Registry is a white-list of service URLs that are allowed to use the UC Davis SSO server to authenticate users, which means people with an account on your site(s) will be prompted to provide both their Kerberos ID and their DUO authentication. The use of the registry is a security measure and also enhances performance by ensuring only authorized sites are processed by the server. Administration of the service registry is done through the CAS Management Application.
Please note your CAS Service Registry questions should be sent to ithelp@ucdavis.edu.
Step 6: Email the SiteFarm team prior to your launch and INCLUDE your chosen live URL address
- It's important to update the domain information BEFORE sending the request in Step 7 to the host clerk. Ideally, please add, or request to be added, your domain name 24-48 hours prior to sending the email to the host clerk or configuring your own DNS.
- If you have a Site Factory account, you have the ability to associate your domain name directly and can skip contacting the SiteFarm team (sitefarm@ucdavis.edu), otherwise proceed to the bullet point below.
- This is an important step as we will configure your site's domain settings to display on your official DNS instead of your xxx.ucdsitefarm.acsitefactory.com or xxx.sf.ucdavis.edu domain.
- We'll notify you when the domain update is complete and then you can continue on to the next step.
- NOTE FOR A RECORDS: If you are configuring your own DNS information be sure to add your live domain to your Site Factory site card FIRST (or ask us to do it for you) before completing the DNS configuration step.
Step 7: Email the campus host clerk with your request
- Email: hostclerk@ucdavis.edu
- Subject line: "CNAME request"
- Body: "Please make the following DNS change:
ourdept.ucdavis.edu CNAME sf.ucdavis.edu
Please make this change at HH:MM on MONTH DAY
Thank you" -
Please DO NOT ask for a CNAME to ourdept.sf.ucdavis.edu or ourdept.ucdsitefarm.acsitefactory.com.
- Our process has changed due to our move to the Fastly CDN service. Read more in our blog "SiteFarm gets even Fastly-er"
- This email will generate a service ticket with the campus host clerk and they will either ask you clarifying questions or advise you when the work has been completed. It will take approximately 30 minutes to four hours for the change to show up online.
Step 8a: Did you swap Primary and Secondary sites inside of a collection?
If so, you will want to send a ticket to the SiteFarm team to ask us to clear the Fastly cache for you. Please include the old site's Site Factory administrative name, which is provided in the site card and will look something like this example:
staffassembly
staffassembly.ucdsitefarm.acsitefacto...
Step 8b: Awaiting the Changeover to your new site
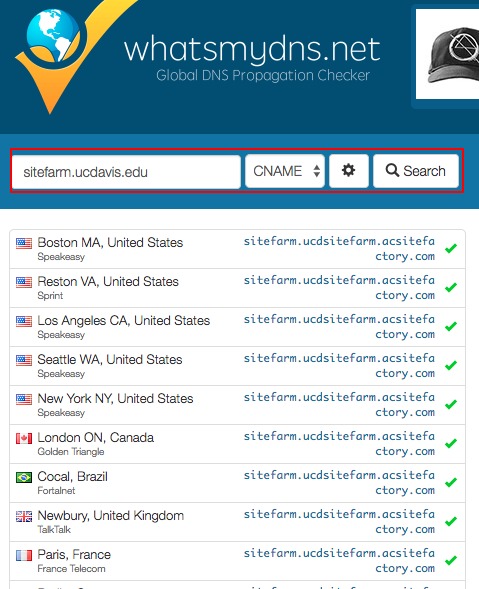
As mentioned above in Step 5, the propagation of your domain on the internet can take anywhere from 30 minutes to four hours. If you want to keep an eye on how things are going, you have the means through https://www.whatsmydns.net.
On the page, you can enter in what your live domain will be, change the menu from "A" to "CNAME" and click the Search button to see the progress of your DNS propagating across major servers.
Step 9: Working in SiteFarm Post-launch
Congratulations! From this point forward, your new login will be your-domain-name/login. For example, https://sitefarm.ucdavis.edu/login. This will allow you to edit your site as you originally did during site creation.
Step 10: Verify the domain being used by your SiteMap
A day after your site is launched you can help search engines correctly index your site by verifying if your site's sitemap is configured properly should you be using more than one domain in association with your site once it's launched.
- Type in your domain name and /sitemap.xml.
Example: https://yoursite.ucdavis.edu/sitemap.xml - A list of pages from your site will display with their full URL. Confirm if the list is using your preferred primary domain name or, if you're using multiple domains for vanity or redirect purposes, one of your secondary domain names instead. If it's the preferred primary, continue to the next section. If it's one of your secondary domains, go to the next step in this list.
- To change a secondary domain to your primary domain in the sitemap.xml list, you can:
- have a person with the Site Builder role in your group, if one exists:
- navigate to Manage » Configuration » Search and Metadata » Simple XML Sitemap,
- click on the Settings tab,
- go to the Advanced Settings section,
- find the Default base URL field and enter your full domain name.
Example: https://sitefarm.ucdavis.edu
- or, email the SiteFarm team at sitefarm@ucdavis.edu to request we update your Simple XML Sitemap settings for you. Please include the full preferred primary domain name in your email.
- have a person with the Site Builder role in your group, if one exists:
Step 11: Check that robots.txt has updated
In conjunction with verifying your sitemap, it's beneficial to double-check that your site's robots.txt file has updated. Prior to launching, your site is programmatically set to use a version of robots.txt that hides your site from search engines and bots until it goes live. Once you publish, the robots.txt file should automatically update and be set as available for indexing.
- Login to the new live URL for your site; this step won't work if you're viewing the *.sf.ucdavis.edu version.
- Navigate to Manage » Configuration » Search and Metadata » RobotsTxt
- In this sentence at the top of the page—"See http://www.robotstxt.org/ for more information concerning how to write your robots.txt file."—click on the link for robots.txt and review the output.
- If the file begins like this, your file has updated appropriately and no further action is required:
#
# robots.txt
# - If your first entry looks like this, then you need to return to the configuration page, scroll down and click the Save configuration button to update it:
User-agent: *
Disallow: / - If an update was required to make the file look like #2, click on the robots.txt file link again and verify that the file updated and is also reflect in the Contents of robots.txt field.