
Take in the View: Extending the All content page to filter by Terms
Project Scope
A few of you have inquired as to whether we could incorporate a way to filter content in the All content page by tags or vocabularies. While we don't have plans to incorporate this functionality across the entire service, we would love to show you how you can do this for your own site if having a way to administer your content based on associated tags or categories would make your work easier and more efficient.
Project Outline
- Clone the All content View to create a new, custom version
- Disable the original All content View
- Build a relationship to article categories
- Add columns each for tags and article categories
- Add filtering options for each tags and article categories
Steps
Create your custom View
- Navigate to Manage » Structure » Views.
- Locate the entry labeled:
Content content Find and manage content. Page (/admin/content) - Click the downward arrow next to its corresponding Edit button and select Duplicate.
- When prompted for a View name, enter something that will make this unique and easily identified. Our example will use Content with Tags. Click the Duplicate button to continue.
Disable the original Content View
- Navigate to Manage » Structure » Views.
- Locate the original Content View in the list and, using its corresponding Edit button, use the downward pointing arrow and select Disable from the list. This will move the View to the bottom of your Views page under the Disabled section.
Build the Taxonomy Relationship into your View
- Locate your new View and click Edit.
- Look at the right-most column and expand the Advanced tab.
- Locate the Relationships section and click the Add button.
- Consider filtering the list by typing in 'sf_article' and then checking the boxes for:
- Taxonomy term referenced from field_sf_article_category
- Taxonomy term referenced from field_sf_tags
- Click the Add and configure relationships button.
- Click Apply and continue for both; we won't require the relationship in order for this process to work.
- Save your View.
Add the new Fields to your content list
- Locate the FIELDS section in the first column of your View and click the Add button.
- Search and check the boxes for 'Tags' and 'Category' (the one that appears in content with sf_articles).
- Click the Add and configure fields button.
- Click the Apply and continue buttons for both.
- Your two new entries will appear at the bottom of the list of FIELDS. However, we want to make sure the Operations Links field appears last because this is the Edit/Delete button available in our All content screen. Click on the downward arrow next to the Add button and click Rearrange.
- Drag and drop 'Content: Operations links Operations' down to the bottom of the list.
- Click the Apply button.
- Save your View.
Add filters to your View specifically for your Terms
- Locate the FILTER CRITERIA section in the first column of your View and click the Add button.
- Locate and check the boxes for 'Tags' and 'Category (field_sf_article_category)'.
- Click the Add and configure filter criteria button.
- Configurations
- Category (field_sf_article_category)
- Vocabulary: Article Categories
- Selection type: dropdown
- Click Apply and continue
- Check the box for Expose this filter to visitors, to allow them to change it
- Label: Change 'Category (field_sf_article_category)' to 'Category'
- Click Apply
- Tags (field_sf_tags)
- Vocabulary: Tags
- Selection type: dropdown
- Click Apply and continue
- Check the box for Expose this filter to visitors, to allow them to change it
- Label: Change 'Tags (field_sf_tags)' to 'Tags'
- Click Apply
- Category (field_sf_article_category)
- Save your View.
Update the Table Format for Sorting
- Locate the FORMAT section in the first column of your View and, next to Table, click Settings.
- In the Sortable column, scroll down and locate the Category row and check its box. Unfortunately, it doesn't appear that the system allows for Tags to be sortable.
- Click Apply.
- Save your View.
- Review your work by navigating to Shortcuts » All content.
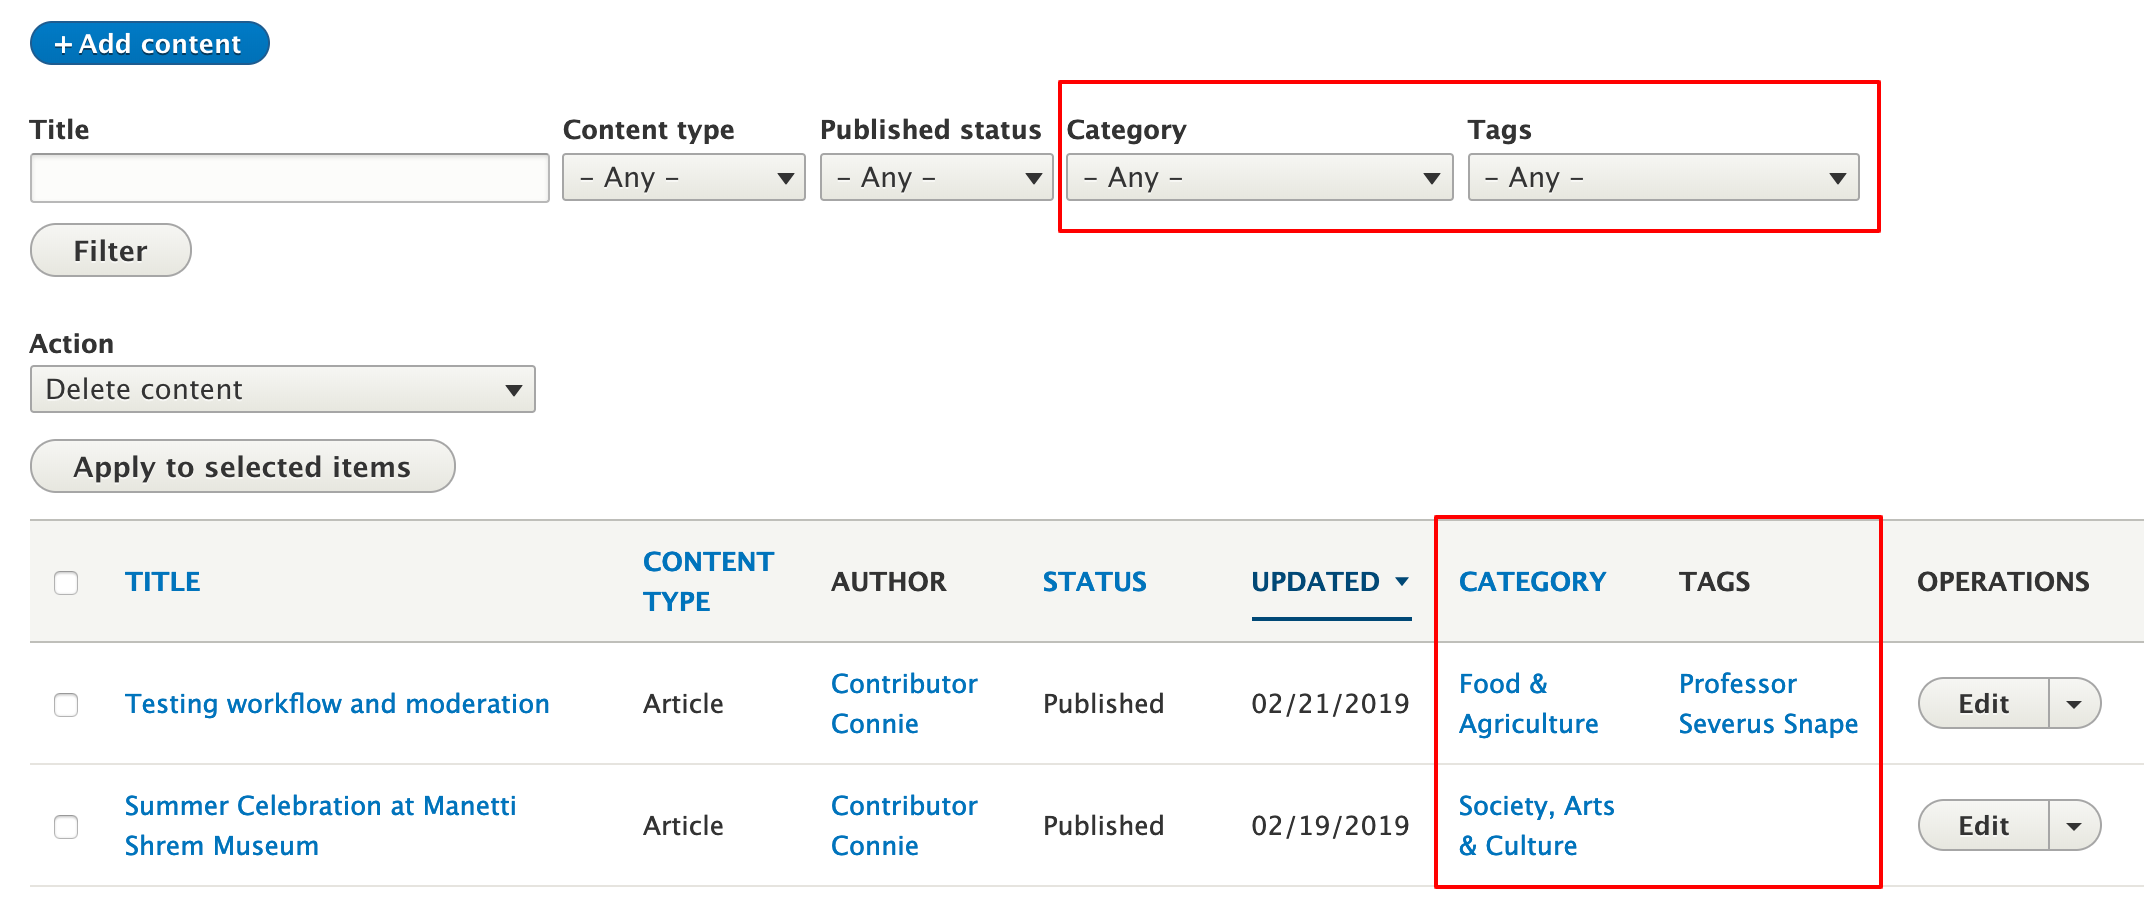
Final Output
Addressing the upgrade path issue
While it's not likely to happen frequently, there is always the chance that future updates to either Drupal Core or SiteFarm may result in a modification to the default All content View that comes standard with all sites. If a site is using the default View, our update process includes two sets of code instructions—add this change to all new sites created from this point forward AND revert all current sites to incorporate this change into the existing structure. By creating your own custom All content View you would miss out on the latter of the instructions.
How do you keep your custom functionality while benefitting from the upgrade?
This is why we recommend at the beginning of this lesson to make a copy of the original and then disable that original. Once you become aware of the update, you can follow this workflow, which includes the original creation of your custom View:
- Original All content View - duplicate and create Custom All content View 1
- Disable Original All content View
- Complete work on Custom All content View 1
- Receive notice of changes to Original All content View
- Re-enable Original All content View
- Disable Custom All content View 1
- Duplicate Original All content View and create Custom All content View 2
- Complete work on Custom All content View 2
- Disable Original All content View
- Delete Custom All content View 1 (optional)