Waiting game
Depending upon the size of your import file, you may need to wait for a while (in excess of fifteen minutes in some cases), especially if your site includes a large number of images. Please don't be discouraged; open a different tab and work on something else in your site if you're able until the process is complete.
Getting Started
Please note: only a user with a Site Manager role can migrate a site. If you haven't already, please use our Service Request Form to ask that the Migration Module be enabled for you. When importing your content from your Wordpress site, it's important to understand the limitations as the script will only migrate content from blogs and posts, but not from menus or from content generated through other plug-ins.
Proceed to importing your migration via these steps:
- Navigate to Manage » Structure » Migrations.
- Click the + Add Wordpress import button.
Upload the file
- You will need to export your site as an .XML file from your Wordpress account and have the file ready for this next step. On the Wordpress import tab screen, you will be prompted to search for, select, and attach your Wordpress site export file.
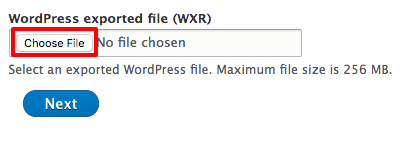
- Click Next to continue.
Configuration Choices
- Authors - Choose an existing Drupal account which will be the author of all WordPress content imported. Click Next to continue.
- Vocabularies - WordPress blogs contain two vocabularies: tags and categories. Here you may choose the Drupal vocabularies to import each into, or omit one or both from the import entirely. You can choose to import your Tags and Categories—or not—using the following options, then click Next to continue:
- Do not import
- Article Categories
- Article Type
- Branding
- Event Category
- Person Type
- Photo Gallery Categories
- Tags
- Content - WordPress blogs contain two primary kinds of content: blog posts and pages. Here you may choose what types of Drupal nodes to create from each of those content types, or omit one or both from the import entirely. Click Next to continue.
- The screen will update and return you to the Migrations dashboard. Look for the SiteFarm Wordpress migrations entry in the table and click its corresponding List migrations button.
Migrating the batch files
When you are returned to the Migration screen, you will see category SiteFarm Wordpress Migrations. The Migration page is your confirmation page indicating you want to proceed with creating the batch files from which your site will be migration. THIS IS NOT THE ACTUAL MIGRATION. When you submit this form, migration processes will be created and you will be left at the migration dashboard to select the batch files you want to migrate into your site.Click on List migrations
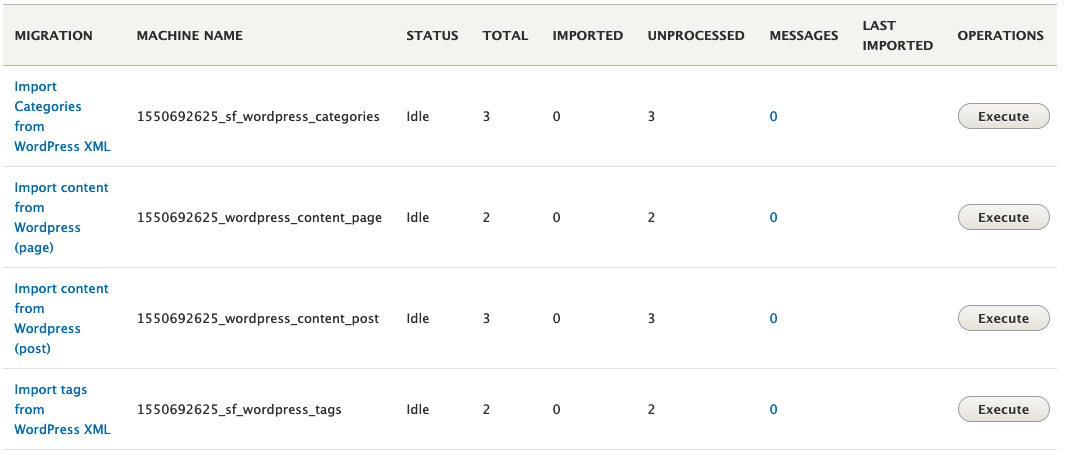
This example includes posts, pages, tags, and categories selected from a Wordpress XML file. The Imported column will read "0" until such time as you choose to run a migration. The Items found column indicates how many items the batch file contains for import.
* Posts and pages can only be imported when tags and categories have been imported, make sure to run those first.
Running a migration
- Click Execute next to one of the labeled items. It is important to note the Tags and Categories need to be imported BEFORE the Pages and Posts can be imported.
- From the Operations column, select Import.
- Press the Execute button.
- The batch file will run and your Wordpress content will be translated into the appropriate content type in SiteFarm based on your configuration choices. When complete, you will see a notification with the amount of items processed. To return to the Migration Overview dashboard to select another file to import, click on Migration Overview on top of the page. Or you can go to your Shortcuts » All content screen to begin reviewing your new content.
Navigating your migration entry
Once you've imported your migration, you'll note at various stages that you have access to various sections of a migration's details, which you click on as a shortcut to get to those pages.

- Migrations - The main Migrations dashboard where all migration entries are listed.
- Edit migration group - Allows you to customize a migration's Label, Description, and Source Type for easier identification.
- Migrations - The specific list of possible or actual migrated content from a the file upload you're currently viewing.
- Migration overview - Available actions:
- Run Import: Start the import. When the import was already done, this will only import new items
- Update: The update option will override all changes to the imported entities and resets then to how they appear in the CSV file. If any changes have to be applied to existing items, roll back the migrations, and start over with a new file.
- Rollback: Rollback the import. This will delete all items that were imported. Use this to undo an import completely
- Reset Status: It might happen a migration gets stuck on "Importing" or "Rolling back" (when closing the browser window, or when an error occurs). Use this to reset the migration back to "Idle"
- Delete migration: Delete the migration. This will NOT delete the imported items. Use when all items are imported successfully and there is no need to rollback in the future.
- Migration overview - Available actions:
- Migrations - The specific list of possible or actual migrated content from a the file upload you're currently viewing.
- Edit migration group - Allows you to customize a migration's Label, Description, and Source Type for easier identification.
Rolling back a migration
In case imported items need to be removed, there is an option to "roll back" the migration.
- Go to the Migration dashboard page and click on the migration entry's List migrations button.
- Press Execute on the migration that needs to be rolled back (Tags, Content, Posts, etc.).
- Select Rollback from the Operation list of radio buttons.
- Press Execute
This will remove all items that were previously imported during this migration.