Use DDev to auto-generate a Subtheme
Set up your Subtheme using a terminal
The absolute easiest way to create a new subtheme is to use our built-in ddev command line command.
- In your command line type:
$ ddev themer-generate-subtheme
- Follow the prompts it asks you, and it will will generate your subtheme. Enter no when asked if you want to use advanced starterkit.

- You will see that your subtheme has been generated.
- You can now find your subtheme in your code editor by going to docroot/sites/default/themes

- Now you need to
cdinto the directory and typegit init. In your code editor type:$ cd docroot/sites/default/themes/my_awesome_theme
Then type:$ git init
This will initialize an Git repository.

- Type:
$ git status
You should see files in red that need to be committed to Git.

- To commit the files to Git you will need to create a new branch. Type:
$ git checkout -b master
Note:masteris the name of the branch.
- Next you want to commit your uncommitted files to Git. Type:
$ git add .
Note: the.means it's grabbing all the files.
- Next type:
$ git commit -m "initial commit"
Your code is now committed to Git

Enable the new Subtheme
If you navigate to /admin/appearance or Manage » Appearance from your admin panel in your local website, you should now see your new custom theme listed.

Manual/Tedious Method: Get and Configure a Subtheme
Manual/Tedious Method: Get and Configure a Subtheme
If you can't use DDev to generate your subtheme automatically, you will want to download one of our two subtheme starter kits. Your options are Basic or Advanced.
Both themes use the SiteFarm One theme as their base, thus allowing you to inherit styling and Javascript. Both themes allow for Drupal preprocessing functions and template overrides.
The Basic is best if you just have some simple CSS or JS you would like to add to a website. With this theme you cannot make use of the SASS variables and mixins from the base theme. The majority of subthemes do not need this. Modern CSS is extremely capable.
The Advanced starter is for users that want to write SASS as a means of generating CSS, and want to inherit variables and mixins from the base theme. Be aware that this requires significantly more maintenance and expertise.
After downloading your preferred starter kit, decompress it and name it. Name it using only lowercase characters and underscores. Something like my_custom_theme, but please make it unique and descriptive.
Now move this directory to your-website/docroot/sites/default/themes.
You should now have your-website/docroot/sites/default/themes/my_custom_theme
Now you have to update some file names and code to match the new name of your subtheme.
Any file within your new subtheme folder that has the name sf1subtheme or is using the machine name sf1subtheme in the code of that file needs to be updated to the name of your theme.
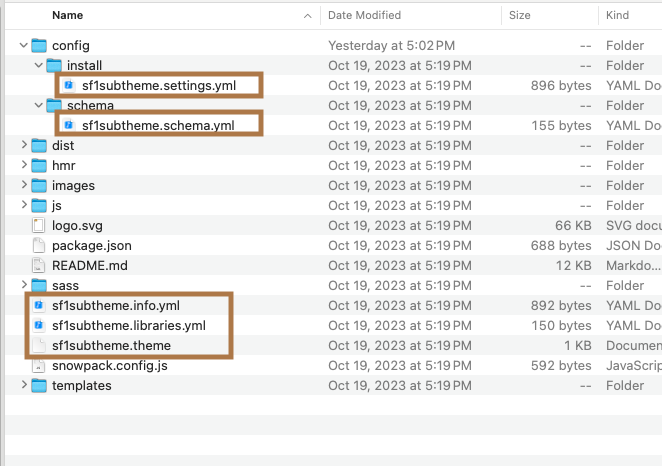
The example above is the Advanced subtheme and may look a little different than the Basic subtheme, but the files that need renaming should be the same.
So using our example theme name of my_custom_theme the files in the image above will be...
my_custom_theme.settings.ymlmy_custom_theme.schema.ymlmy_custom_theme.info.ymlmy_custom_theme.libraries.ymlmy_custom_theme.theme
Now you will have to use the find and replace feature of an IDE(code editor) or manually find and replace all instances of sf1subtheme with my_custom_theme in the files.
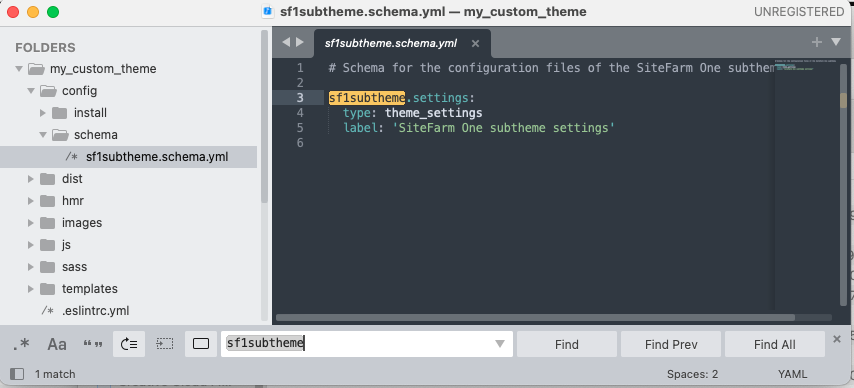
Use your IDE to search all files, but here is a list of likely places you will need to update the theme name.
my_custom_theme.schema.ymlpackage.jsonmy_custom_theme.info.ymlmy_custom_theme.theme
You will also want to update your theme information in the my_custom_theme.info file.
name: SiteFarm One - Subtheme
type: theme
description: This is a subtheme of Sitefarm One
package: SiteFarm
core_version_requirement: ^9 || ^10
You really just need to update the name and the description if you would like.
name: My Custom Theme - Subtheme
type: theme
description: A SiteFarm subtheme for department X.
package: SiteFarm
core_version_requirement: ^9 || ^10
It would also help to prevent confusion if you changed the theme screenshot.png file. By default it inherits the one from the base theme, so you need to add a screenshot.png with dimensions of 512x448px to the root of your custom theme. The file name must be screenshot.png and it must be located in the root of your subtheme folder. Do not nest it in a subfolder. This should get picked up and be visible when you choose your theme in the appearance menu on the admin side of your website.