Determine if the Workflows module has been enabled on your site
If this information isn't shared with you by your Site Manager, the easiest way to find out is to Edit an existing page or create a new piece of content and select your preferred Content Type. Scroll to the bottom of the screen.
Not Installed
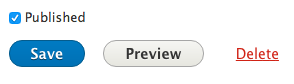
If you see this configuration with a checkbox next to Publish, you do NOT have Content Moderation and Workflows installed.
Installed
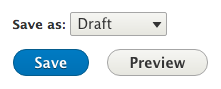
If you see this configuration with a Draft drop-down menu, Content Moderation and Workflows is installed and assigned to this Content Type. Note: a Site Manager can choose to assign workflows to one, several, or all the Content Types in your site.
Saving new content to Draft or Publish
- Add new content and select your Content Type (Basic page, Article, etc.)
- Enter in your content
- Scroll to the bottom. From the drop-down menu:
- Contributors: Draft option only
- Editors and Site Managers: Draft or Publish
- Click Save to finish.
Working on a Draft version of Published content
- Select the content that has already been published. Make your edits.
- Provide a message in the Revision log message field located under Additional Options on the right side of your screen.
- Scroll to the bottom and, from the drop-down menu, select Draft.
- Click Save to finish.
Explanation: The new Workflow functionality allows you to leave your Published content in place while at the same time creating one or more Draft versions of the page. Adding the Revision log message will be an essential step to help you tell the difference between one saved Draft versus another when it comes time to select one to Publish, Delete, or continue your editing.
Updating Published content from a Draft
Method 1: Use the Quick Publish option from View mode
You will know if your content is in a Draft state if you View the page and see this message:
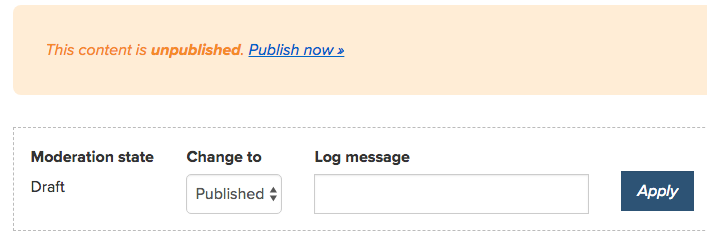
You can enter a Log message and click the Apply button to publish the latest version of your Draft.
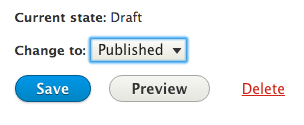
Method 2: Regular Change to / Save option at bottom of page
After editing your content, you can scroll to the bottom of the page, change the drop-down menu to publish, and click Save to finish.
Method 3: Pick a specific Draft from Revision to Publish
It's possible and quick likely you will save multiple Drafts while editing content that also has a published version online. This creates multiple Draft state save points, which are accessible via your page's Revision tab.
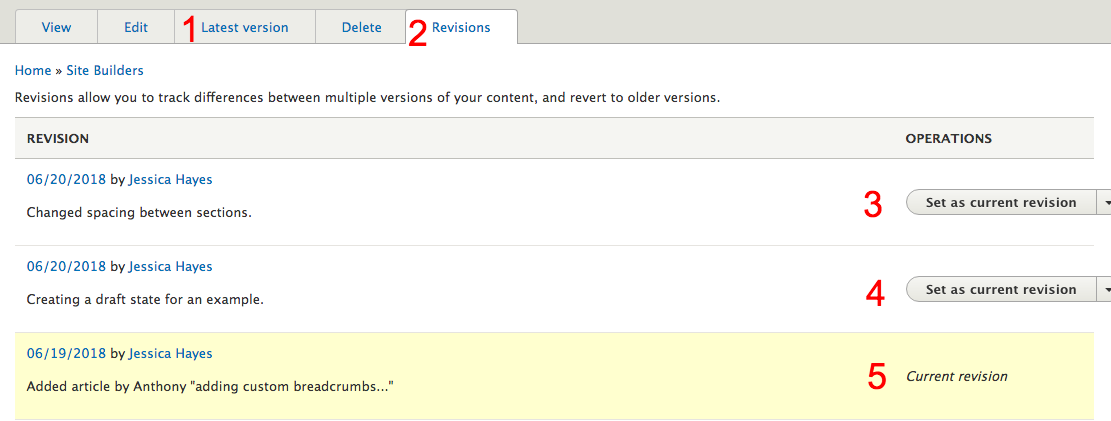
- Latest version: This tab will take you to the latest version of the page, which in this example is the second Draft listed at the top of the Revisions tab.
- Revisions tab: This is a View that displays all the save point history of this piece of content. It provides the save date, author name, the Revision log message, and a button for "Set as current revision" or "Delete". Providing a log message makes it far easier to differentiate one change from another in the list.
- Set as current revision (top of list): The site will create a save point for every Draft state you save. Using the Set as current revision button will make that save point the Published version.
- Set as current revision (second Draft or older): If we use an earlier Save as current revision in the list, it moves this Draft to the top of the list and makes it the first candidate for replacing the live content if Published.
- Current revision: This represents the page's last saved point when it was Published.
Deleting Drafts
DO NOT DELETE YOUR DRAFTS FROM THE ALL CONTENT SCREEN OR FROM THE BOTTOM OF YOUR PAGE WHILE IN EDIT MODE. This will completely delete your page. Sadness will ensue because it can't be restored.
- Navigate to the page that contains a Draft mode you no longer need.
- Click on the Revisions tab.
- Locate any listings for Set as current revision and use its drop-down menu to access the Delete option for that Draft state save point and select it.
- The screen will update and ask you to confirm that you want to Delete the Draft or Cancel. Click Delete to proceed.
- The screen will update and return you to the Revisions tab listing showing that the selected Draft save point is now gone.
Archiving and Restoring Content
Once content has been Published, Editors and Site Managers have the ability to pull that content off the web and effectively put it in digital storage using the Archive option, available from the same drop-down menu that offers Draft and Publish. The Transition will only allow from the direction Published > Archive; the alternative is to keep the page as a Draft.
Once Archived, an Editor or Site Manager can locate it in the All Content list, Edit the page, and change its state to either Draft or Publish depending on the need.