Need a little extra guidance?
We've built a four-part video series to help you get started. Take a look on our Vimeo channel.
Downloading the site from Site Factory
- Select Backup the site from Site Factory’s site card drop-down list, located to the right of the Log in button.
- Once the site has finished backing up, an email will be sent with a link to download the site.
- Click on the link or go directly to https://www.ucdsitefarm.acsitefactory.com/site-archive-list
- Click the “Download” link which will download a tar.gz file.
- If you are on a Windows computer, you will need a program like 7zip http://www.7-zip.org/ to open the file.
- Extract the contents to your computer and rename the folder to something useful.
Set-up your local environment
You will need a LAMP style development environment setup with Apache, PHP, and MySQL. The recommended tool is Docksal. This free, open-source app simplifies the process immensely.
- Install Docksal
- Open a Terminal window, and navigate to the root of the unpacked folder that you downloaded from Site Factory.
- Be sure you're in the root of that directory. If you run the command ls -al you should see files with names: .docksal, acquia-pipelines.yml, composer.lock, etc.
- Run one command: fin themer/init
If you want to use something different, there are many options available such as MAMP https://www.mamp.info, WAMP http://www.wampserver.com/en/, or Drupal VM https://www.drupalvm.com/ . Just know that you will have to perform all the configuration that Docksal would otherwise do for you automatically. So it's a lot more work.
Drupal settings for local development
There are 3 files in the /docroot/sites/default/ directory that Drupal will rely on for doing local development: settings.php, settings.local.php, and services.local.yml. They contain additional settings that you can configure.
Docksal automatically downloads and configures them for you, and you would rarely if ever need to touch them.
Preparing a subtheme of “SiteFarm One”
Option 1: Manually
- Download a subtheme starter kit from https://bitbucket.org/ietwebdev/sitefarm-theme-one-subtheme-starterkits/downloads/?tab=branches
- There are 2 starter kits: Basic and Advanced.
- The Basic branch is a simple starting point for doing CSS, Javascript, and Templates.
- The Advanced branch allows using Sass, es6 Javascript, and advanced theming with BrowserSync.
- Extract the starter kit into /docroot/sites/default/themes/ and rename the folder to site.
- Using a terminal, cd into your theme's site directory and type “git init”.
- If you don't have Git installed on your computer, you can use Docksal's built-in Git. Simply type "fin exec git" instead of "git" for all your Git commands. For example: "fin exec git init".
- Commit the subtheme code and push it to bitbucket or github.
Option 2: Wizard
- Open a terminal/command line.
- $ cd docroot
- $ fin drupal sitefarm:generate:subtheme
- Follow the prompts and it will create a new subtheme based off of your answers.
- Initialize a new git repository in the newly created subtheme (see steps 3 & 4 above).
Connect the theme repository to Site Factory
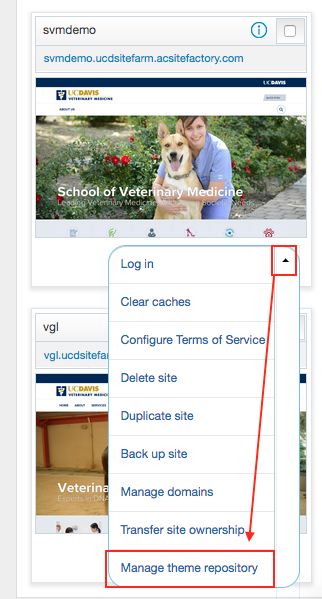
- Navigate to your site card in Site Factory (https://www.ucdsitefarm.acsitefactory.com).
- From the drop-down arrow next to the Login button, select Manage theme repository from Site Factory’s site drop-down menu.
- Click Connect site repository.
- Grant access to the Repository
- Bitbucket: Click Show SSH public key and copy it. Add this to a git repo.
- Click “Settings”, then “Access keys”, and then “Add key”.
- Github: Click “Settings”, then “Collaborators and Teams”.
- Add "ietwebdev" to the "Collaborators" list.
- Bitbucket: Click Show SSH public key and copy it. Add this to a git repo.
- Add the git URL into “Git URL” like [email protected]:ietwebdev/sitefarm-theme-one-subtheme-starterkits.git.
- Add a branch or tag into “Branch or tag” such as “master”.
- Click Save.
- Clear your site's cache by selecting Clear caches from Site Factory’s site drop-down menu.
More information can be found here: https://docs.acquia.com/site-factory/theme/external.
Local Dev Tips
- Use “Drush” in a console from the docroot directory with:
$ fin drush - Log in as an Administrator:
$ fin drush uli --uri="sitename.local" - Use “Drupal Console” in a console from the docroot directory with:
$ fin drupal - Create a subtheme using a wizard:
$ fin drupal sitefarm:generate:subtheme - The following modules can be disabled, but it is not strictly necessary to do so.
- acsf_*
- From the command line cd into the docroot of your site
- Then use the following drush command:
$ fin drush pm-uninstall acsf
- acsf_*
- Acquia_connector
- SamlAuth