If you need to create a series of links, consider creating it as a menu block. The custom menu option creates a unique list of links, including
- an optional title for the link collection (displaying the title is optional when placing)
- your choice of displayed text for the link
- a field to embed a link to an email address, internal page in your site, or external URL
How to create a custom menu
- Using your admin panel, navigate to Manage » Structure » Menus.
- From the top of the list locate and click the blue button labeled + Add menu.
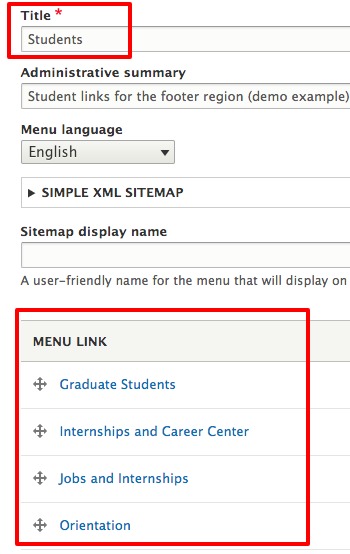
- The Add menu screen will ask you to provide:
- a Title - this is required for the purposes of identifying the menu in the system, but you can choose to not display the title or even change it at the time you place it in a region in your site
- an Administrative summary - not required, but very useful, especially as your custom library of blocks grows over time. Using the summary field you can identify how this block is intended to be used and where, making it easier to find when search in the primary block list.
- Click the Save button to continue.
- You will proceed to the Edit menu screen and click the + Add link button.
- Enter a Menu link title and Menu link. Please note the rules for links: Start typing the title of a piece of content to select it. You can also enter an internal path such as /node/add or an external URL such as http://example.com. Enter <front> to link to the front page. If you enter in an email address, preface the email information with mailto:. Example: mailto:[email protected].
- Scroll to the bottom and click Save.
- Repeat steps 5-7 until you have added all your links.
- Your custom menu is now complete and available for use in your site. Visit the Blocks documentation for steps on how to add menus and other types of blocks to your content.
Placing a Custom Menu Block on one or more pages
Because your site can only handle so many blocks, it's important that you consolidate your blocks whenever you can. Adding a menu to a list of pages one by one would result in the creation of multiple instances of you menu block when, in fact, you only want one. This is the most efficient process for doing so.
- Navigate to the Block Layout page.
- Locate the region where you want your block to display and click its Place Block button.
- Filter for your block by name in the dialogue box or scroll through the list to locate your menu block.
- Click the Save Block button.
- Locate your newly placed menu block in the selected region and click on its Configure button.
- Use the block's Visibility | Pages section to list the pages that should all display this block in the chosen region. You have these options:
- List each page by its URL Alias, each on its own line. Example:
/news/ucdavis-news-today
/news/putah-creek-development
/blog/helpful-hints
<front> - Select entire sections of your site based on how you've structured your URL Path Settings. All content under a parent page will be denoted by the page name followed by '/*'. Example:
/news
/news/*
- List each page by its URL Alias, each on its own line. Example:
Demo Example
An example of a working menu block, titled Students I, has been added to this page in the footer.