
Many Happy Returns
Add "Save Draft" On Webforms So Visitors Can Complete Them Later
Is your webform a little on the long side? Did you already know this and tried breaking it up into sections using the wizard page tool? Do people pack a lunch and block off time on their Outlook calendar when they know they have to submit something on your site? Yeah—maybe give these folks a way to save their spot and come back to it when they have time to finish your form, and let us give you a helping hand to add this feature to your form if it needs it.
Webform Configuration Settings
The following settings enable visitors to access the option to save their webform in-progress, which includes anonymous users who do not have an account on your site.
- Navigate to Manage » Structure » Webforms and either create your new webform and click on its Settings tab or do so from the webform dashboard listing button menu.
- Under your webform's Settings » Submissions tab:
- In the SUBMISSION BEHAVIORS section check the box for "Show the notification about previous submissions".
- In the SUBMISSION ACCESS TOKEN SETTINGS section check the box for "Allow users to update a submission using a secure token".
- In the SUBMISSION DRAFT SETTINGS section check the radio button for "Authenticated and anonymous users" and check the box for "Automatically save as draft when paging, previewing, and when there are validation errors". Optionally add your own custom Draft saved message and/or Draft loaded message.
These settings get us part of the way to our goal; it enables the feature, but we now need to ensure we have the necessary fields on the form and that those fields are configured appropriately for our needs.
Preparing your webform fields to work with Save Draft
An Email Address is Essential
This entire feature hinges on you including an email address field in your form. The email address collected will be used in the email handler we'll build in a later step so that, after clicking the Save Draft button, the webform can send the visitor an email confirming their saved form and provide a link back to return and finish it at a later time.
Add an email field
- Navigate to your webform's Build tab.
- Click the +Add element button
- In the Filter by element name field, type "email" and let the auto-filter do it's thing.
- From the filtered list, click on the Add element button for the "Email" option.
- Provide the element with a name. "Email" is fine.
- Make certain the Allowable number of entries is limited to 1.
- Under FORM VALIDATION, check the box for "Required".
- Click Save to finish.
Ensuring your visitor adds their email before Saving
Even though you set the email address field as "Required", this is only really triggered when the person uses the Submit button. We need a way to make sure they can't bypass this field or else it renders the Save Draft mechanism worthless; it will still save their data, but due to some users' browser privacy settings (delete cookies and tokens when browser is closed) and the many ways people can reach your form—smartphone, tablet, web browser—they may not be able to access the saved version unless you manually send them the link. So, let's add a webform conditional that hides the Save Draft and/or Next page buttons unless an email address has been added.
Add a conditional
- Go to the bottom of your webform and locate the Submit button(s) section and click on its Customize button.
- Click on its Conditions tab and provide the following settings:
State: Visible
If All of the following is met:
Email (or whatever you named your Email field above)
Trigger/Value: Filled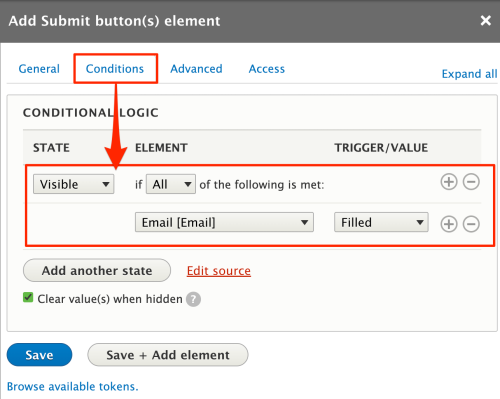
- Click the Save button to finish.
This is great, but we need to forewarn our visitors that providing an email is required to proceed, either to save a draft or to continue to the next page, and thus reveal those buttons.
Update the Email field information to include Description information
- From the Build screen, locate your Email field and click its Edit button.
- In the ELEMENT DESCRIPTION/HELP/MORE section, enter a message in the Description field. Here's some example verbiage:
This field is required in order to use the Save Draft and/or Next Page button(s). - Scroll to the bottom of the Element settings field and click the Save button to finish.
Review your webform's changes
- Click on your webform's View tab and verify:
- Your help message is present.
- The Save Draft and/or Next page buttons are not visible, unless...
- You enter an email in the Email field to test if the buttons are revealed and they appear as expected.
Create an Email Handler Expressly for Draft Saves and Updates
The final step is to create the mechanism—an email handler—that will automatically send a message to a visitor when they click the Save as draft button. The automated message can include the values they've already entered into the webform along with a link that will bring them back to their specific form entry so they can update and continue to completion.
Add and configure a Draft email handler
- Navigate to the form's Settings » Emails/Handlers tab.
- Click the +Add email button.
- Give the handler a title that's used as an internal identifier for your purposes. Example "Draft Created".
- In the handler's settings, set the following:
- SEND TO: Email (email) or whichever field you have created in your webform to capture the visitor's email information.
- MESSAGE
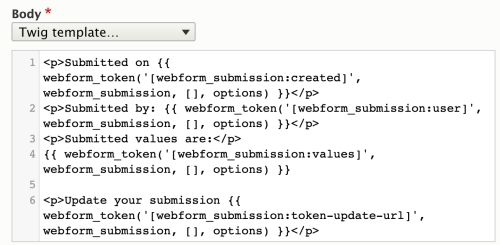
- Change Body from Default to Twig template
- Copy and paste this Twig line where you feel appropriate (I added it at the bottom of the values) and, if desired, change the readable 'Update your submission' text at the beginning:
Update your submission {{ webform_token('[webform_submission:token-update-url]', webform_submission, [], options) }}
- While still in the handler, click on the Advanced tab
- ADDITIONAL SETTINGS, check the following boxes:
...when draft is created
...when draft is updated
- ADDITIONAL SETTINGS, check the following boxes:
- Click Save to finish.
- Test your form. Open a new incognito window, enter the URL to your webform, complete just a couple of fields, including the email address, then click Save as Draft. Wait a minute or two to see if you receive a boilerplate notification in your email address' inbox. Click the link included to see if it takes you back to your partially completed webform.