
The Hero Banner gives the chance to create a block that is the full width of the screen containing a large image, with a call to action link, a link to media, which is ideally intended for your home page.
To create a Hero banner
- From the admin panel, click on Shortcuts » All Content » Blocks.
- Click on the +Add content block button.
- From the list of available blocks, click on Hero banner.
- Configure the available options (outlined below).
- Click Save to finish.
Configure your Hero banner
Available options include:
- Block description - A brief description of your block used by the system
- Primary image - The image should be, at a minimum, 2000 pixels wide. One file only. 3 MB limit. File types allowed: png gif jpg jpeg
- Title - The main title text to appear as the banner headline
- Sub Title - This text will appear below the main Title headline. It is ok if this text is longer like a sentence or two. Just be sure to review the results in mobile display as well as desktop.
- Link
- URL - Start typing the title of a piece of content to select it. You can also enter an internal path such as /node/add or an external URL such as http://example.com. Enter <front> to link to the front page.
- Link text - This will generate a Call To Action button on top of the main banner image.
Video button - Add a Youtube or Vimeo video URL such as https://youtu.be/PAwB_t_iM7U or https://vimeo.com/79504673 to create a button which will play the video once clicked.
In the specific case of YouTube, you will need to use the video's Share URL, located beneath the video itself.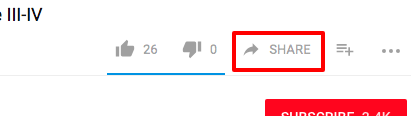
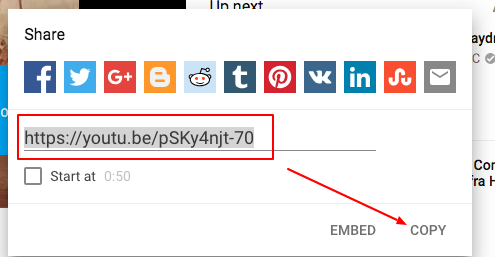
Clicking on the share button noted in the first image opens a modal window that reveals the condensed URL you should use in your Hero Banner block. A convenient Copy button will copy the URL to your computer's clipboard to make it easy to paste.
ALERT: If you add text to your Hero Banner and also select a focal point on the image's far left or right side, this selection point will crop to the center in mobile view. This behavior is expected and has been deliberately designed this way. The crop you are seeing has nothing to do with the image Focal Point. In mobile, the Hero Banner is "visually cropped" via CSS whenever text is added to the Hero Banner. This is necessary because if the image stayed to proportion the text would fall off of the bottom and spill into the content below. Therefore, the sides of the image are sacrificed. If the Hero Banner is just an image with no text then the image will stay at its desired proportions. If this is problematic, we recommend reviewing the composition and treatment of your image to move the primary subject matter closer to the center of the banner so it always remains in frame IF text has been added.
When the block configurations are complete, move on to reviewing your block's visibility.
Adding the hero banner to the Block Layout
- Once your block has been created, you can proceed to Shortcuts » Blocks from the admin panel.
- Choose a location:
- To add it to the top of your homepage, but beneath the primary navigation, locate the Page Title region of the list for an alignment with the body content OR use the Pre-Title region to display the banner edge-to-edge, the full width of the visible space.
- Click the Place block button.
- Scroll through the list or use the filter field to find your hero banner block. Click its corresponding Place block button under the Operations column.
- Configure your block:
- Image Size (make certain your image is prepped to your preferred size before uploading)
- Default - original 2000 x 770px
- Large - 2000 x 1125px
- Small - 2000 x 460px
- Text alignment
- Left
- Center
- Right
- Title Brand Color
- Default (white)
- Primary (blue)
- Secondary (gold)
- Image Effects
- Default
- Darken the background image so that the text on top is easier to see
- Fade from a Sepia overlay color to default
- Apply a rotating overlay of rainbow colors (the colors change in real-time without refreshing the screen)
- Image Size (make certain your image is prepped to your preferred size before uploading)
- In the Visibility section, enter <front> in the Pages field to restrict the banner and only display it on the homepage.
- Click Save block to finish.
- Check your page for the output.