Understanding Layout Builder's configuration and structure is key to learning what's available and how to use this feature.
Layout Builder Elements
Now, let's identify Layout Builder's sections and their purpose.
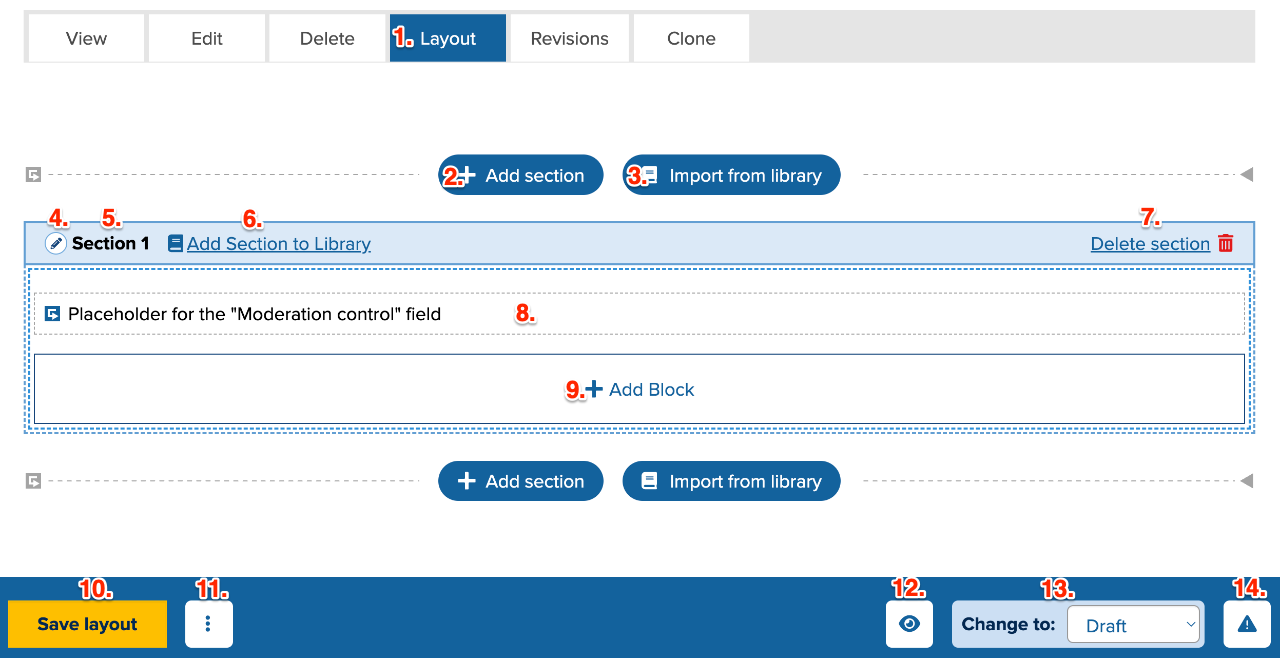
- Layout - To access the Layout Builder feature, you need to first create a Basic Page, provide it a title, and then click Save. At this point, the Layout button will become available. When you click the Layout button the new interface will appear.
- + Add Section - The starting point for adding blocks and layout templates.
- Import from Library - A repository of pre-created layouts and/or blocks, made either by the SiteFarm team or by your department.
- Configure Section icon - Opens a modal window with options to style and configure the relevant Section. Includes:
- Administration section name, viewable only by those with an account on the site
- Vertical and horizontal spacing
- Branding colors
- Background images
- Custom CSS field
- Administrative Section Name - defaults to Section # and can be changed via the Configure Section icon.
- Add to Library - If you come up with a layout configuration that is particularly useful for your site needs, you have the option to add it to your Layout Builder Template Library with everything attached in the section, making it very simple to create a new page and use the Import from Library feature to drop it into the new page.
- Delete Section - Remove a section permanently. Please note that unless the section was previously saved to your Template Library, there is no recovering the layout.
- Placeholder for the Body, Documents, Tags - The Layout Builder feature is an add-on and doesn't replace the default page components you're accustomed to seeing when you first create a page unless you choose to remove them using the Regions Override option. The main body content, file attachments, and tags can still be used and included; layout builder can encapsulate these and continue using them, and this section shows you where they will sit in the page's layout. Main content from the Body region will only display if you have first saved the text in the regular Edit view, then clicked Layout and then Save Layout. The display will update to include any body text you've added in the screen's preview.
- + Add Block - Add an in-line system or custom block, or if enabled a global block, to your layout. Blocks are handled differently in Layout Builder and it's important to understand the distinction between in-line and global blocks in the specific context of using Layout Builder.
Documentation for understanding in-line blocks, global blocks, and making the latter available in Layout Builder - Save Layout - When ready to save your changes, click the Save Layout button. An exclamation point will appear on the upper right corner of the button to remind you if you have unsaved changes.
- Service Tray menu - Click on the three vertical dots to slide out the service tray containing these options:
- Discard changes - If you've had second thoughts about any changes you made after your last save, you can discard your current edits.
- Revert to defaults - Returns ALL settings for the entire layout back to their original defaults.
- Add to library - Similar to the Add to Library above, but this will save the page's entire layout, inclusive of all sections created, to the Template Library.
- Eye icon/Show content preview - If content has been added, it will display while in Layout mode. On by default. When toggled, all live display content is removed and only the block titles/admin names are visible.
- Publication status - If workflows are enabled, choose from Archive, Draft, or Publish. Otherwise, Publish can be toggled.
- Messages icon
- Revision log message field - This is the exact same field as is available from the Edit tab under the Additional Options right panel section to record the changes you made to the page. All messages from either location are compiled and displayed in a listed in the page's Revision tab.