The system allows you to embed files into your text in two different ways; through the Media Library or through the Insert File icon. Ideally, you should only be using the Insert Media icon, but here's an outline as to why:
| Type | Pros | Cons |
|---|---|---|
| Insert Media (from the Media Library) |
|
|
| Insert File (from File icon upload) |
|
|
Naming Conventions
How you name your file matters. Of course, you want it to be human-readable, but it's important to remember that shorter is better and, prior to uploading your file, you want to make sure that there are no spaces in the name. If there are spaces in the name, replace them with underscores or hyphens otherwise there's a risk of the link breaking because of the insert of "%20" characters which represent open spaces in the URL.
Original filename: "Student Admissions Numbers for the School 2018-2019 FINAL.docx"
Would output to Student%20Admissions%20Numbers%20for%20the%20School%202018-2019%20FINAL.docx
Change to example: "student-admissions-2018-19.docx"
This is the preferred and recommended best practice for inserting files.
Inserting a file via the Insert Media icon (Recommended)
- Edit your page and click in the WYSIWYG's body region where you would like to add the link to your file.
- Click on the Insert Media icon

- From the vertical tabs, change your location from Images to Documents.
- If your file is already in your Media Library, scroll through your list of documents and check its box and then click the Insert Selected button. Note that you can check multiple boxes if you would like to add several files at once.
- If your file isn't in your site yet, click the Choose File button from under the Add File title.
- Locate and click on the file(s) to be uploaded.
- In the Add or Select Media popup window, provide the following information:
- Name - (required) The file name to be associated with the file. Example: advanced-degrees-prgm-2021.pdf
- Description - (optional, but recommended) The title of the file that's visible to visitors. If this is left blank, the system will display the file's Name field information instead.
- Category - (optional) One or more taxonomy terms assigned to your file to make it easier to search for and manage your files in the future. If using more than one tag, separate each with a comma.
Demonstration of an embedded file on a page in SiteFarm using the Media Library:
Use the Media Library to create an embeddable link
- Navigate to your site's Media Library.
- Locate your document and click its Edit tab or pen icon.
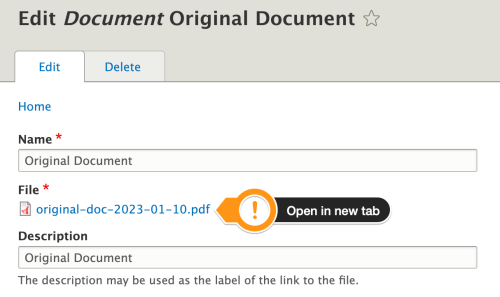
- In the file's Edit screen, locate the section labeled File * to find the link to your file. Right-click on the link and use your browser's Copy Link feature to copy the link to your computer's clipboard.
- Return to your page where you would like to embed the link to your file.
- Edit your page. With your desired text highlighted using your cursor, click the Link icon
 and paste in your copied link in the URL field.
 - IMPORTANT: your pasted link will show the full URL path to your site. You need to change this to REMOVE the domain portion of the link. Example:
Pasted link:
https://examplesite.ucdavis.edu/sites/g/files/dgvnskXXXX/files/media/documents/demonstration-file.pdf
Remove the site information at the beginning (https://examplesite.ucdavis.edu) so you only display the link information from /sites onward so the URL looks like:
/sites/g/files/dgvnskXXXX/files/media/documents/demonstration-file.pdf
Demonstration of an embedded file on a page in SiteFarm using the Media Library:
This is an example of a link created using the link copied from the media item. This is the demonstration pdf file.
Please use the Insert File option only if the Media Library steps won't work in certain circumstances
Creating a file embed using the File icon
- Enter your body text in the WYSIWYG.
- Highlight the text that will contain the link to your file. Make sure that the text used for your link clearly indicates what it is referencing. This not only creates clarity for your visitors but also aids in creating accessible links for people who rely on screen readers to interact with your site.
- Click on the file icon in your icon bar:

- The Add File dialogue box will appear. Click on the Choose File button.
- Select a file from your local computer or any cloud locations you have sync’d with your system.
- Click Save to complete the Add File process.
- Scroll to the bottom of your page and click the Save button to finish.
Demonstration of an embedded file on a page in SiteFarm using the Insert File icon:
Cum sociis natoque penatibus et magnis dis parturient montes, nascetur ridiculus mus. Donec quam felis, ultricies nec, pellentesque eu, pretium quis, sem. Nulla consequat massa quis enim (PDF). Donec pede justo, fringilla vel, aliquet nec, vulputate eget, arcu.
Overwriting and/or Replacing Media Files
Files embedded or linked through your Media Library can be replaced. The steps vary slightly depending upon which attachment location you're using—a media library attachment (Documents, Primary Image, Photo Gallery Image) or a link embed in your WYSIWYG.
Overwriting media files used in a media library attachment field or WYSIWYG
- Navigate to the file in the Media Library that's currently being used in the attachment field and click its Edit button.
Locate the Replace File section and click the Choose File button. Find and select your replacement file from your preferred source.
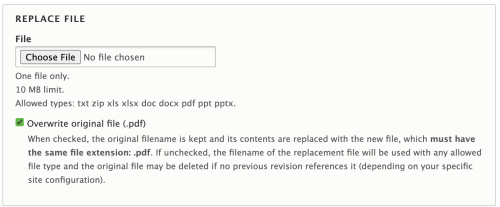
- Overwrite original file options:
- Replace and KEEP original file/path name - Checkbox enabled
In many cases the pathway users have created is one that is shared and, as such, they would like it to persist for continued use.- Notes:
- when replacing and keeping the same file/path name, the replacement file MUST use the same file extension as the original file: PDF ⇒ PDF or .png ⇒ .png
- Notes:
- Replace and KEEP original file/path name - Checkbox enabled
- Scroll to the bottom of the screen and click Save.
From the Media Library screen, click on the media you just updated. From the media element's details page, right click on the link to the media and open it in a new tab or window. THIS IS AN ESSENTIAL STEP as it clears caches that would otherwise continue to display the previous version.
- When the media item opens, refresh it in your browser to verified that it has changed.
- Return to your page where the media item is used, refresh your browser and verify the content is updated.
Completely replace the file
You can either delete the original piece of media and replace it, or use the following steps to replace the file directly overtop of the original. Please note if this is used as part of an embedded link, the link itself will need to be redone as the pathway will have changed. After following steps #1 and #2 above, upload the new media, uncheck the Overwrite original file, and click Save.
- Replace AND update file/description/path name - Checkbox disabled
When the URL pathway isn't a critical aspect of the update or the user explicitly needs for the link path to reflect the file update, uncheck the Overwrite original file box. When complete, the replacement file's filename will be used in the pathway. If the Name/Description field is updated AND this file is being used in a Documents section, the file's text display will also be updated with the new title.- Notes:
- if the original file contains content that should not remain available on the web for legal, health, or safety reasons, please follow the recommended steps in the Fancy File Delete section
- Notes: