
The impact of file size caps
"All I did was edit my page—I didn't touch the original image"
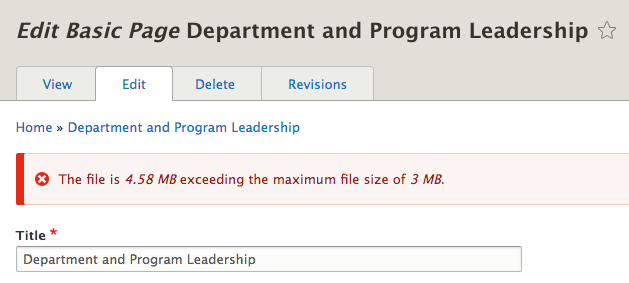
While we've always advocated for properly optimizing images for the web, it's only since we instated a consistent limit of 3MB file sizes for every attachment region in SiteFarm that the impact of that change in our 5.0.0 release has brought to light how that truly affects our users and their sites. Maybe this has impacted you or maybe you haven't come across it yet, but let's take a look at how you can review your site's files to identify and replace culprits before they become a real problem.
Recognizing the issue when it happens
The SiteFarm code has a process that detects the size of the files attached to your site, especially images, and the system will throw an alert on your screen to let you know it can't proceed because it has encountered a file size that exceeds the allowable limit. We had this in place in several instances, but our update now makes it consistent throughout your site. The problem that now arises is pre-existing images that exceed this limit when you go and edit content that already includes images larger than 3MB. On clicking the Save button to commit your edits, the system will display these warnings:
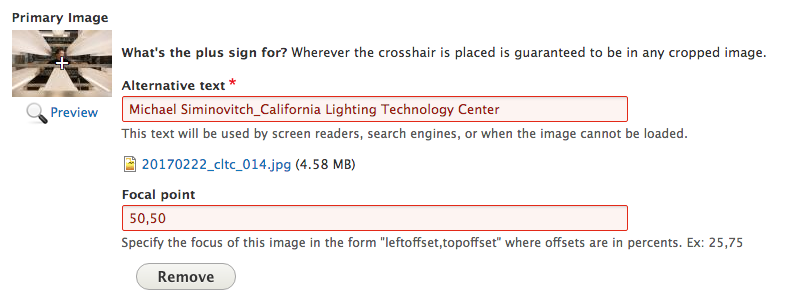
The unfortunate truth is that, in an example like this where you discover the file size issue while editing other content, you can: a) cancel everything and back out until you're ready to deal with it, b) remove the image to save your work, or c) replace the image with a new version with a smaller file size immediately in order to save your work.
How to proactively fix oversized images
If you haven't come across this problem and hope to avoid it, we can help you proactively identify problem files on your site so you can work to address the issue independent of any necessary edits.
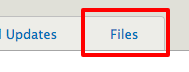
- Navigate to Shortcuts » All Content » Files tab.
- In the table list of files, click on the Size column title to sort by the largest file size first.
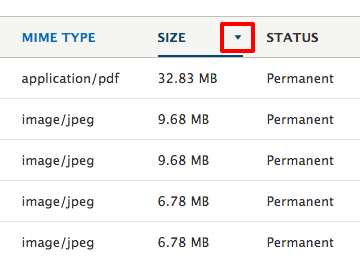
- If you spot any that are over 3MB, these will be the ones you'll need to review and replace with an optimized version. You can discover which pages are using the specific image by clicking on the corresponding "Used In' number in the far right column.

- Clicking on the Used In link will display one or more pages/blocks where your file is currently in active use. You can use this to help navigate quickly to the pages or blocks with the overly large files and work to replace them using the Entity link list.
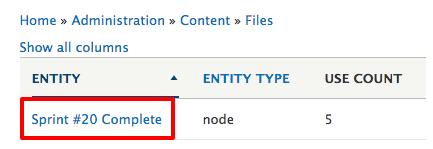
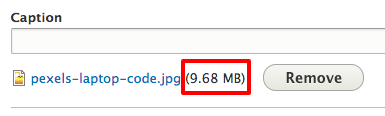
- Click on the Entity link to go to the page and then use the Remove button to take out the file and then replace it with the same image optimized or a different one that is less than 3MB in size.
Resizing services and applications
The most logical question upon discovering you have excessively large images is "how do I fix them?" You're going to need to use a graphics software program or a free online service to resize, by dimensions and/or dots per square inch (dpi). In either case, applications like Photoshop or GIMP can be helpful, but if a license fee is out of the budget or you're not allowed to install third-party software on your computer, you can also look to free services online, like tinypng. If these options won't work, consider searching Google for free image resizing sites that might better suit your needs.