
Take in the View: Creating a "Live Client List"
Hey everyone,
We're adding a new section to our blog offerings to talk about Views, Content Types, and all the other built-in elements Site Builders can use to elevate your site's content and functionality. Since these will be projects created by me, our SiteFarm team, or our clients, this will take a more informal approach; these advanced elements can seem mysterious and intimidating at first, so I want to make it as approachable as I can.
This isn't a step-by-step how-to; scenarios vary far too much for things to be identical and a certain amount of basic Views knowledge is required for this to make sense. If this topic is entirely new to you, take some time to learn about Views first. These write-ups are meant to show you what's possible so we can set free your imaginations to discover new methods for presenting your content to the world.
Project Outline
Did you know we have almost 400 sites in Site Factory? Of those 400—as of this writing—144 sites have launched! Until this past week, we've been creating a manual list of URLs so people interested in seeing what others have done with their sites could visit and gain some inspiration. But, with so many sites, this list was becoming unwieldy and unpleasant to use. So, I wanted to do something new to:
- showcase our clients' latest new sites
- make the page easier to use
- generally look nicer
- oh, and if I can add something to the home page that leads to the full client list page, then that's great too
Necessary Components
Like a lot of you, I haven't worked much with Views before. I mean, I've duplicated a couple of existing ones to get a feel for how our default Views like /people and /news work, but that's been it. I wasn't entirely sure how I was going to make this happen, but in the end, I came up with this list, which I'll explain in more detail as we go along.
- A taxonomy of campus organizations
- A Content Type
- A new image style
- A View to output a list of clients
- A way to search the View
- A way to filter the View to sites related by campus organizations
- A View to showcase the latest launched sites
- A block to display my showcase on the homepage
- A link to SiteFarm PatternLab code/style guide
- (TL;DR Roundup - give me the tips)
Whew! That's a lot of stuff and not necessarily in the exact order.
Where do we start?
Taxonomy
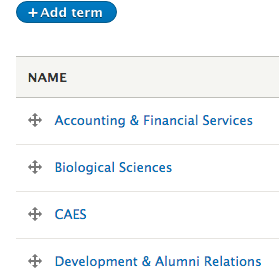 By trial and error, I discovered it's a good practice to create first the content that other content relies on to function. Meaning, I can't include a list of campus organizations if the list doesn't exist in the first place. My list was based on the way SiteFarm structures our Site Factory groupings for client administration.
Documentation for creating Taxonomies.
Content Type
If you've dabbled at all with Content Types, you may already know you're not currently able to duplicate the existing Content Types we use for SiteFarm. This means all new Content Types have to be created from scratch. My takeaway on this topic is that you need to really think in advance about what information you're going to need for your output when the content is displayed. Ultimately, I decided on the following fields for my Content Type:
- Title (provided by default, the name of the client's site)
- Body (provided by default, will contain a single sentence description of the client site)
- Site Image (taken from the client site to showcase their logo or main page, or failing that, a way to add a royalty-free image)
- Live site URL (so I can provide a link to the client's site)
- Launch date (so I can sort my list allowing my showcase to show the most recently launched sites)
- Campus organization taxonomy (assign the client site to a campus group)
This is the point at which I was able to make the connection between my Taxonomy and my Content Type. Each Content Type has a way to manage fields and their displays:

Each field has its own configuration options and, where I have my Campus Organization field, I told the system I wanted to make it an Entity reference. This setting means I can create a connection, or relationship, between the existing Campus Organization vocabulary (a list of names), and the field in my Content Type, resulting in a selectable drop-down list in what I'll call my "Live Sites page type".
When I'm done configuring my settings, my field list looks like this:
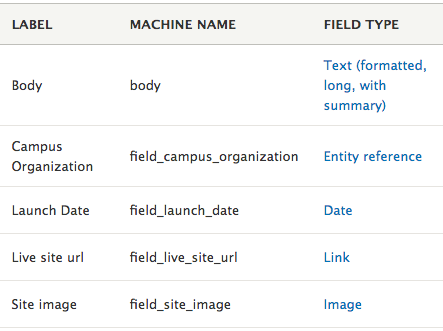
Notice that the Title field isn't listed? It's included by default.
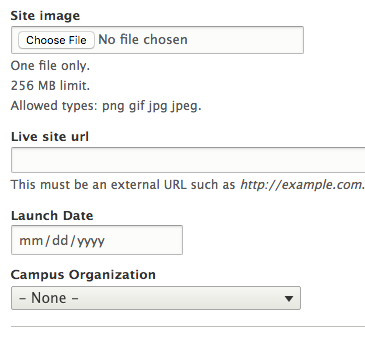
This is the resulting output when I go to add a new Live Site page type to my site:
We don't cover how to create Content Types, but there's a lot of tutorials online or through UC Davis' Lynda.com portal. A couple of quick videos can help you get started, but keep in mind SiteFarm is going to look different and have different options available than you might see in online tutorials.
- LevelUpTuts Tutorial #8: Creating a Content Type
- LevelUpTuts Tutorial #9 - Custom Content Types Part 2 Manage Display
A final word of advice: create a few pieces of content using your new Content Type; if you don't, your View won't have anything to display while you work through your View configurations.
A View to output a list of clients (a.k.a. "the embed")
With the groundwork set, I moved on to creating the initial View. I'm going to spare you the gory detail, but this whole project took me the better part of a week to complete, mostly because I had no idea what I was doing and a lot of trial-and-error was needed to complete it. My View is actually two views in one! I had no idea you could embed one or more Views into another. But, now you do. You just got a week's worth of time back. You're welcome.
Let me explain how I did this so you can do it, too.
- I navigated to Manage > Structure > Views and clicked the + Add View button.
- I provided:
- Name - "Live Sites"
- Description - "A multi-display view showcasing latest client site launches, a campus organization filter, and a complete list of live sites"
- View Settings: Show "Content" of type "Live Sites (my content type)" sorted by "Newest first"
- Clicked Save and Edit.
Once in the View, I went to the Display section and clicked the +Add button and created a Page View and an Embed View. Later on I would make the Block View, but we'll leave that for now.
Embedding one View into Another
The nature of the Embed View is to add it to a different Display mode. I chose to add mine to the Page View in such a way that it would stack the content on the page; first the showcase (Page View) followed by my list of sites (Embed View). I also picked this one over the Attachment View because, in Drupal 8, exposed filters (search, filter) will only work in the Embed display mode.
- Click on the Page display and locate the Footer section in the middle column of options.
- Click the Add button.
- In the Search field, type in "View" and from the filtered list check "View area - Global - Insert a view inside an area". Make certain you apply it to the page display only!
- In the Configure Footer: Global: View area modal window, use the "View to Insert" menu to locate your Embed View.
- Click "Apply (this display)" only.
- Always Save your View changes.
Here are the settings I used for my Embed View:
- Format: HTML List
- Settings:
- List type: Unordered list
- Alignment: Horizontal
- Settings:
- Show: Fields
- Settings:
- Provide default field wrapper elements checked
- Settings:
- Fields
- Title [hidden]
- Live site url [hidden]
- (field_campus_organization: Taxonomy term) Taxonomy term: Term ID [hidden]
- Global: Custom text
- Filter Criteria
- Published (= Yes)
- Content type (= Live Sites)
- Sort Criteria
- Title (asc)
- Header
- Global: Text area (Global Text area)
- ADVANCED tab
- Relationships
- field_campus_organization: Taxonomy term (this is a reference to my custom Taxonomy vocabulary)
- Other
- Use AJAX: Yes (helps make sure the Exposed Filters work correctly)
- Relationships
Though this is out of order, this is the final output shown in the image that follows. It involved a custom output which is detailed below in the Custom Outputs and Replacement Patterns/Tokens section.
A way to search the View
Because I wanted to restrict my search option to only the above list of sites and not include the showcased sites, I needed to incorporate the search in my Embed display. (See a note about Resets and No Results in the TL;DR Tips at the bottom.)
- Locate the Filter Criteria section.
- Click the Add button.
- Search for "search" and choose the Search Keywords option.
- In the configuration options:
- For (This embed (override)
- Expose this filter to visitors
- Provide a Label
- Click Apply (this display) to finish.
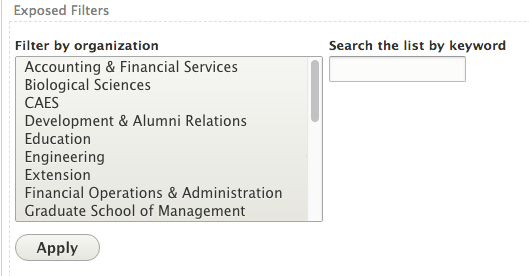
A way to filter the View to sites related by campus organizations
As above, I only wanted the Campus Organization taxonomy relationship to apply to this list, so once again I needed to be in my Embed's Display mode. (See a note about Resets and No Results in the TL;DR Tips at the bottom.)
- Locate the Filter Criteria section.
- Click the Add button.
- Search for "search" and choose the Content: Campus Organization option.
- In the configuration options:
- For: This embed (override)
- Expose this filter to visitors checked
- Filter type to expose: Single filter
- Provide a Label
- Operator: Is one of
- Allow multiple selections checked
- Display error message checked
- Reduce duplicates checked
- Click Apply (this display) to finish.
- In the Settings options:
- Vocabulary: Campus Organizations
- Selection type: Dropdown
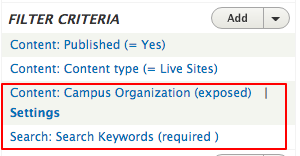
The above settings result in the following output in the View's Preview:
A Page View to showcase the latest launched sites
Here are the settings I used for my showcase Page View:
- Format: Grid
- Settings:
- Number of columns: 3
- Alignment: Horizontal
- Settings:
- Show: Fields
- Settings:
- Provide default field wrapper elements checked
- Settings:
- Fields
- Title [hidden]
- Body [hidden]
- Campus Organizations [hidden]
- Launch Date [hidden]
- Live site url [hidden]
- Site image [hidden]
- (field_campus_organization: Taxonomy term) Taxonomy term: Term ID [hidden]
- Global: Custom text
- Filter Criteria
- Published (= Yes)
- Content type (= Live Sites)
- Sort Criteria
- Launch Date (desc)
- Header
- Global: Text area (Global Text area)
- Footer
- Global: View area (Global: View area) <-- our Embed View
- Pager
- User pager: Display a specified number of items | 3 items
- More link: No
- ADVANCED tab
- Relationships
- field_campus_organization: Taxonomy term (this is a reference to my custom Taxonomy vocabulary)
- Relationships
I wanted to find out how far I could push the available options WITHOUT having to subtheme my site. Thanks to a quick comment from my colleague, Anthony Horn, I found out that you can insert custom HTML and already declared CSS classes into a View.
Custom Outputs and Replacement Patterns/Tokens
So, that obviously raises the following questions:
- How do I add my own HTML?
- Where do I get these pre-declared classes?
- How do I combine 1 and 2 with content dynamically created whenever I complete a new Live Site page type?
Creating a Custom text field
If you review my Fields list you'll note that all my fields have been set to Hidden. Why? Because I don't want to use the View's default display. Instead, I added an extra field called Global: Custom text. To work properly, it must appear at the bottom of the Fields list because it can only "see" and make use of the fields that precede it; any that come after are essentially invisible to my Custom text field.
Where to find pre-created CSS Classes and HTML
Our designers, Mark Miller and Anthony Horn, have done amazing work creating a style guide containing all the code related to the presentation of the SiteFarm sites. We use a system called Atomic Design to help us break things down into their smallest parts for easier consumption. This link to our PatternLab will land you on the full page of style examples, but what you'll really want to do is go through the Atoms, Molecules, and Organisms menus at the top of the page to narrow your search to exactly the components you would like to emulate.
Either View Source the page or use your browser's Inspect option to look at the code surrounding your desired component in PatternLab. Without doubt, this is the most involved part of the process because you will need to experiment with how much of the HTML you actually need to get your output to work and format correctly.
Here is an example of the HTML for a Focus Box I created based on the code available from PatternLab:
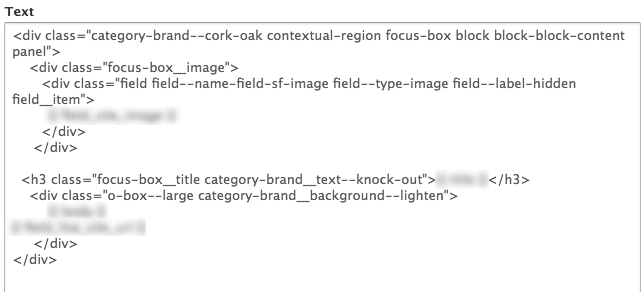
Notice it incorporates both the HTML and CSS classes I need. These are official SiteFarm classes, so I don't need to make any CSS changes.
Combining HTML and CSS with my Live Site Content Type dynamic content
The structure was in place, but next I needed to insert the content dynamically. Drupal includes a component called Replacement Patterns or Tokens. These create a representational placeholder that instructs the system to drop in the corresponding field content if it meets your configured criteria. From my Fields list, I had access to the following Replacement Patterns:
- {{ title }} == Title
- {{ body }} == Body
- {{ field_campus_organization }} == Campus Organization
- {{ field_launch_date }} == Launch Date
- {{ field_live_site_url }} == Live site url
- {{ field_site_image }} == Site image
- {{ tid }} == Term ID
- {{ nothing }} == Custom text
With this information available, here's the final HTML, CSS, Token structure:
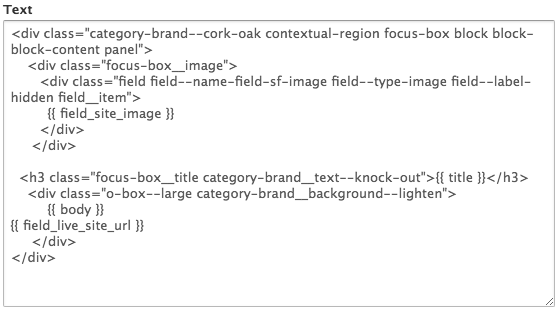
Make sure to structure your Tokens correctly—the double curly braces are essential to making this work: {{ your_token_name }}.
Clean-up and Adjustments to the Combined Page and Embed View
Everything was going swimmingly until I checked my View as a web page. I was soooo close, but some tweaks were still needed:
- I had picked a grid, but the spacing was off in the balance of my three blocks at the top of the page
- My single column list of sites was making my page a scrolling nightmare
- The image dimensions weren't fitting quite the way I wanted
In reviewing the available styles in PatternLab, I had come across the Quad Layouts page and the List styles.
Page View style adjustments
I edited my grid Settings and unchecked the options for default column and row classes and instead added the following in the associated fields:
- Custom column class: l-quad__region
- Custom row class: l-quad--third
Embed View style adjustments
I edited the Settings for the HTML Format with these options and styles:
- No row class
- No Add views row classes
- List type: Unordered list
- Wrapper class: item-list l-column--3 list--arrow
- List class: empty
- Navigate to Manage > Configuration > Media section > Image styles.
- Click the + Add image style button.
- Provide a style name. I created Poster 1280x720.
- Add the effect. I configured it to Scale and crop 1280×720.
- Click Update Style to finish.
I returned to my Page view and the Fields section. Even though my Site image field was set to "hidden" it still applies the settings associated with the field when I reuse its Token in a different way. So I updated the Image style dropdown to my new "Poster 1280x720" selection.
The result? Magic. Take a look for yourself on the Live Client Sites page. All that from five fields in a content type. Seriously, this is the power and flexibility of structured content.
Finally, the Block View
I suppose I could have stopped with just the page, but I wanted folks to notice their fellow SiteFarmers' success in getting their sites online and learn more about them. I wanted a block almost identical to Latest News or Upcoming Events, but obviously set to pull from my Live Sites Content Type.
Following all the steps I'd learned doing my other two Views, here are the settings I used for my Block display on my homepage:
- Format: Unformatted list
- Show: Fields
- Settings:
- Provide default field wrapper elements checked
- Settings:
- Fields
- Title [hidden]
- Rewrite Results
- Output this field as a custom link. Link path: {{ token_name }}
- Rewrite Results
- Launch Date [hidden]
- Live site url [hidden]
- URL only checked
- Site image [hidden]
- Image style: Thumbnail
- Link image to: Nothing
- Global: Custom text
- Title [hidden]
- Filter Criteria
- Published (= Yes)
- Content type (= Live Sites)
- Sort Criteria
- Launch Date (desc)
- Pager
- User pager: Display a specified number of items | 3 items
- More link: Yes
- Link display: link to my Page View
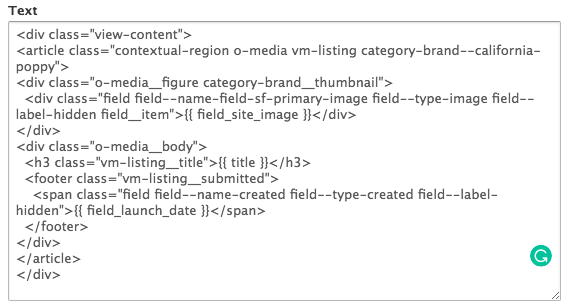
Here's the HTML, CSS, Token structure I used:
The block now lives on our homepage. Check out the lower left corner to see the three most recent site launches.
TL;DR Roundup
The takeaways I learned from this project:
- Create first the content that other content relies on to function.
- Spend time thinking about what information you're going to need for your output when the content is displayed before you get started. Write it out so you can refer back to it.
- If a Content Type and View are involved, create a few pieces of content so your View has something to work with and you can see your results progression.
- Entity References make relationships between pieces of content.
- It's possible to embed or attach one or multiple Views into another View.
- If using exposed filters, you have to use the Embed option, or else your filters won't work.
- "Custom: text field"allows you to rewrite your output and add HTML and pre-created CSS classes into your site, bypassing the need for sub-theming.
- PatternLab is an awesome resource.
- When including a "Custom: text field" make certain it's the very last field in your list or else it won't have access to the full list of Replacement Patterns.
- You can include a custom "No Results" message for improved visitor experience. Each View display has a 'No Results Behavior" section in the middle column where you can set options for a null search return.
- You can also include a Reset button for your exposed filters to return visitors to the page's original state. This is located under the Advanced tab > Exposed Form > Exposed Form Style: Settings. Check the box for "Include reset button".