Take in the View: Creating a "Two Column Person" List
This isn't a step-by-step how-to; scenarios vary far too much for things to be identical and a certain amount of basic Views knowledge is required for this to make sense. If this topic is entirely new to you, take some time to learn about Views first. These write-ups are meant to show you what's possible so we can set free your imaginations to discover new methods for presenting your content to the world.
Project Outline
This project involves finding a way to display a simple list of people in a minified way. Here's the scope:
- Include:
- A profile image
- First and last name
- Position title
- Office location
- Phone number
- Sort it alphabetically by last name
- Exclude a link to a full Person page; we don't need it for a simple contact list
- Present the information in two columns on the page
- Make the output responsive
- Have the View filter the output by a Tag or Person Category so multiple outputs can be created to show only the members of a specific group. Tags will likely be used because we can add an unlimited number in case a person belongs to multiple groups.
Necessary Components
- Person pages, already filled with the information we'll need, including tags
- A single View with one or more Page Displays, each one representing a different type of output
- Custom output using replacement patterns or tokens
- Essential field tweaks
- A method in each Page Display for filtering by tag term
- A link to SiteFarm PatternLab code/style guide
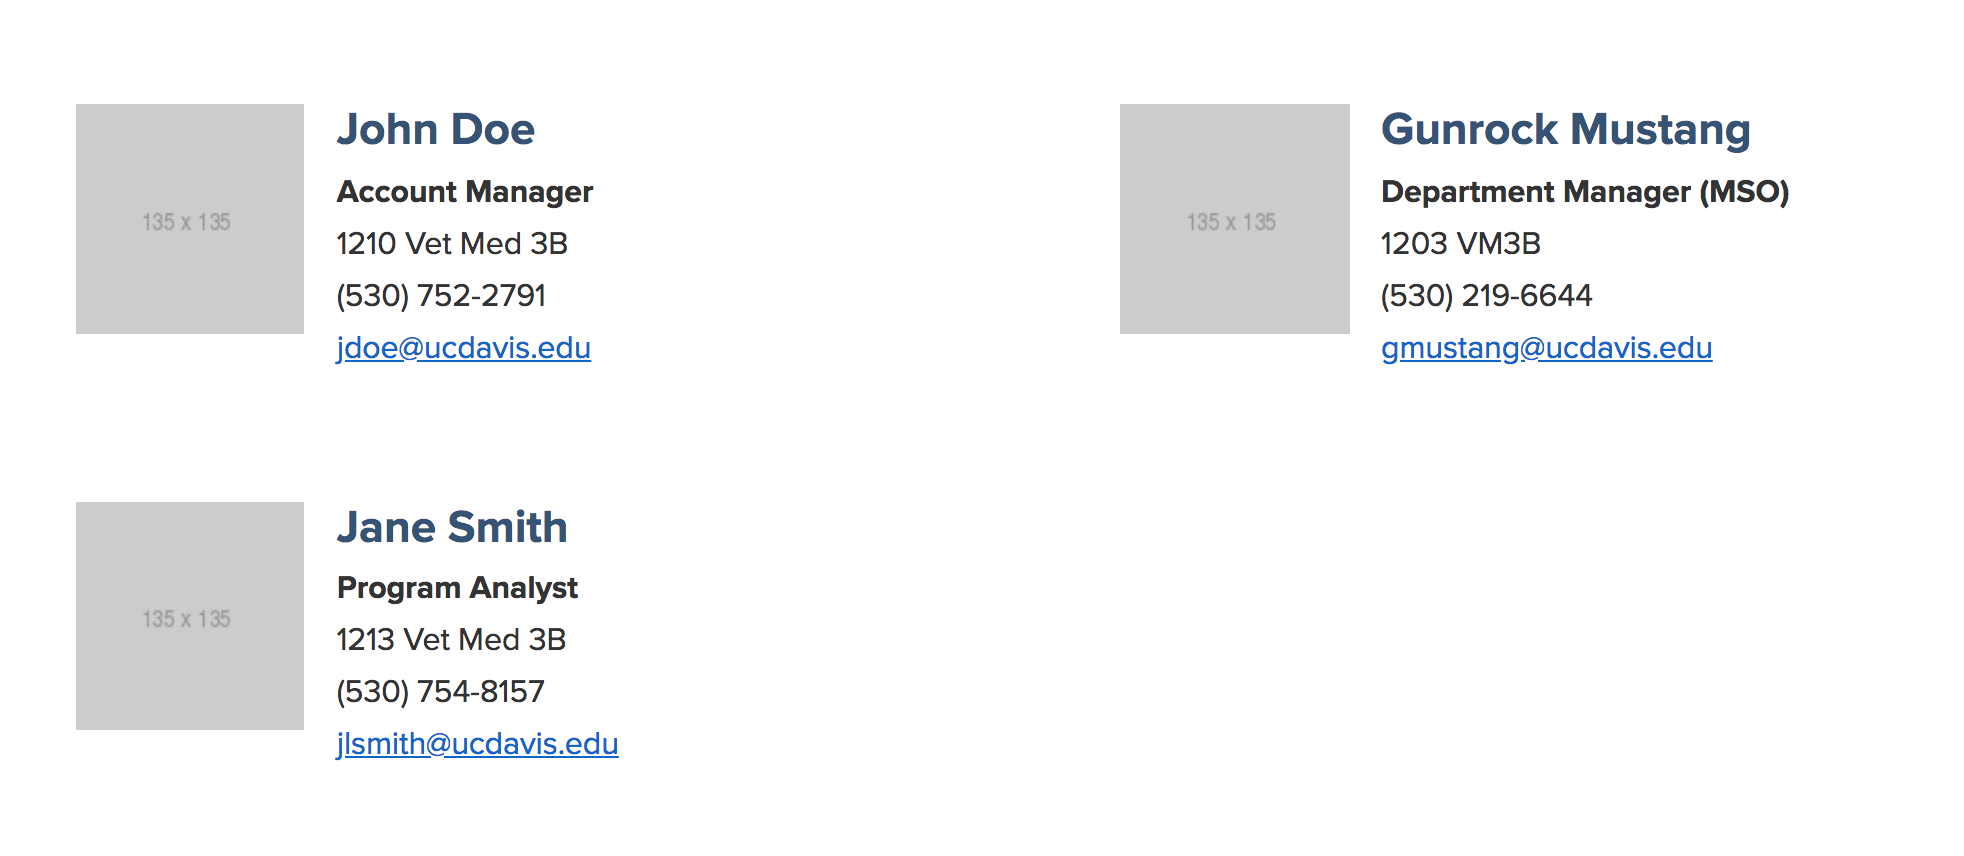
Mock-up
Here's what we're aiming to create:
A single View with one or more Page Displays
If you're looking to create custom Views, you're way beyond how to create a Person page, so we'll skip right past that step and move straight on to the View.
- Navigate to Manage » Structure » Views.
- Click the + Add View button.
- Provide the following:
- View Name
- Description - this will be helpful if anyone else is working on your site at this level and needs a quick glance aid in knowing what this View is meant to do.
- View Settings - set this for:
- Content of type Person tagged with <blank> sorted by <Unsorted>
- Page Settings - check
- You can set the Page Title and Path now if you want, or leave it blank
- Page Display Settings - Grid | Fields
- Click Save and Edit to finish.
Page Display Settings
Once you've created your initial View structure, you can move on to configuring its settings. I would strongly recommend reading the first blog Take in the View: Creating a "Live Client List" I wrote as it talks in detail about classes, PatternLab, and replacement patterns. This project will overlap some of those steps, but be specific to this scenario.
Custom Page Display Names
Let's start with supposing that you will eventually have several different groups of people you want to display, perhaps on separate pages. This means each page in your View will need its own Page Display. If you look under the Display title you'll see:
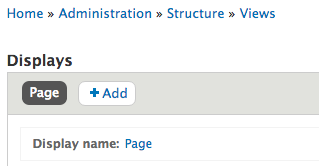
If you keep adding new Page displays, it's going to repeat that name and it'll be hard to tell one from another unless you click on it to see what that particular Page Display is meant to show. Make your life easier and rename your Page Displays with a meaningful title. It's a good rule of thumb to know that anywhere in your View that is shown in blue or presented as a link, is a clickable option. So, directly below the DISPLAY title and Page Display list is: Display Name: Page. The name "Page" is a blue link. Click on this to change its name. Remember: until you scroll down and click on the Save button, your changes will not be saved.
Configurations
TITLE
- Title that will display on the page
FORMAT
- Grid » Settings:
- Grouping field Nr.1 - <-None->
- Number of columns - 2
- Automatic width - checked
- Alignment - Horizontal
- Default column classes - unchecked
- Custom column class - l-quad__region
- Default row classes - checked
- Custom row class - l-quad--half
- Field » Settings: use the defaults with no changes
FIELDS
In the Search field enter sf_person to narrow your list and select the following list of entities. When offered the chance, prevent all these from displaying in their default form by using each field's Exclude from display checkbox:
- Content: Primary Image
- Content: First Name
- Content: Last Name
- Content: Position Title
- Content: Office Location
- Content: Phone Number
- Content: Email
- Content: Person Type
Click the FIELDS Add button again. This time add Global: Custom text. Be sure to add it to the very bottom of the list. If you need to reorder your list of fields, use the Add button's drop-down arrow and select Rearrange to drag 'n' drop your fields into the necessary order.
FILTER CRITERIA
We'll be adding more to this later.
- Content: Published (= Yes)
- Content: Content type (= Person)
SORT CRITERIA
Click the Add button and choose Content: Last Name (asc).
PAGE SETTINGS
The Path, ultimately, is up to you, but when configuring the link leave out the initial forward slash "/". This format is a holdover from Drupal 7 and Views are pretty much the only place in SiteFarm you'll encounter this anomaly when it comes to formatting your internal links.
Menu: If you want a link in your main navigation, or in a drop-down menu, this is the perfect place to set this up.
PAGER
How many people should appear on the list? Given that it's two column, you'll want this to be an even number. I'll leave mine at the default "10", but you can set yours to whatever makes sense.
SAVE YOUR WORK.
Creating the Custom Output using Replacement Patterns
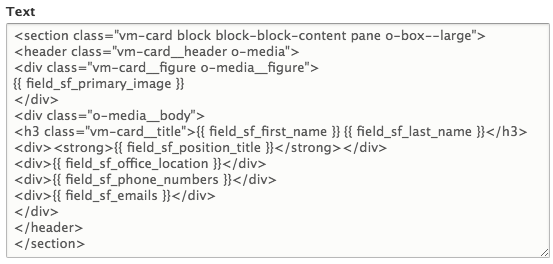
As mentioned in the first Take in the View blog post, formulating the HTML and CSS classes seems to always be the most involved part of the process. I looked through our PatternLab to find the general look I wanted, settling on the Card style as the basis of my output. I needed to tweak it several times, but here's a screenshot of the final output I entered into my Global: Custom text field:
Additional Field Tweaks
My output was close, but a few more changes were needed. The output above was creating a too-large image for what I wanted, the email addresses didn't have a properly formatted link, and the telephone was shown as a link, which I didn't want on my page.
Image adjustment
- Clicked on Primary Image [hidden]
- Set Image style to "Article Teaser (135 x 135)"
- Clicked Apply
Phone number adjustment
- Clicked on Content: Phone Number [hidden]
- Changed Formatter from "Telephone link" to "Plain text"
- Clicked Apply
Email link syntax correction
- Clicked on Content: Email
- Clicked on REWRITE RESULTS label to expand it
- Made sure the "Output this field as a custom link" box was checked and updated the Link path field to include "mailto:" right before my replacement pattern token
- Clicked Apply
SAVE YOUR WORK.
Filtering a subset of people using a tag term
You have your options for how you might filter a group of people for display; you can use the Person type vocabulary or a tag term. If each person only belongs to a single group, consider the Person type. If your people belong to multiple groups—a not uncommon circumstance in academia—then use tag terms instead. In either case, it means that your Person pages will need to contain this information first in order to be evaluated by the View for display.
For this example, I used a tag term:
- Under FILTER CRITERIA, click the Add button
- Use search to find and select Tags (fields_sf_tags)
- Click Add and configure filter criteria
- In the Tag's configuration options under Vocabulary, this is where you can choose either Person Type, Tags, or your own custom vocabulary if you prefer, then choose Selection type Dropdown
- Click Apply and continue
- In my example, I chose from my Tags list. I left the default Operator as "Is one of" and from my Vocabulary Tags list, chose "DVM" as the tag representing the department for this group of people
- Check Reduce duplicates
- Click Apply to finish
SAVE YOUR WORK.
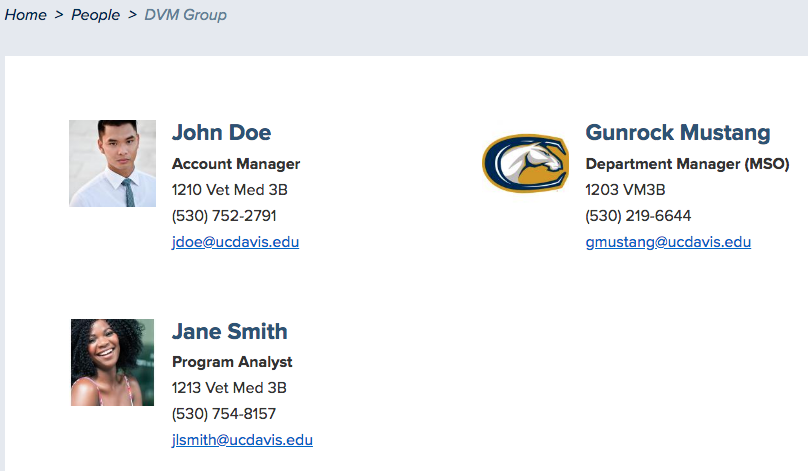
Final Version
With those settings in place here's what my page looks like now when I have three example people sharing the same tag: